A detailed look at the Exakta Varex shutter from the 1950s
In this post, I’m going to take a detailed look at the shutter used in the Exakta Varex series of cameras from the 1950s and 1960s. The particular shutter I’m describing was used in the Exakta Varex IIb, but the shutter in many of the different Exakta Varex models used very similar techniques, so I hope this article will be useful to anyone with an Exakta to repair.
Background to this article.
I wanted to provide a little background as to why I’m writing this article and advise some precautions to anyone reading it.
I have four Exakta Varex cameras at the moment that all have problems with their shutters.
- One Exakta Varex IIb had a problem with the second curtain and has now had a new curtain fitted.
- Another Exakta Varex IIb has a problem with curtain timing, and the shutter won’t ‘latch’ as it’s cocked.
- A third Exakta Varex VX1000 has a good shutter, but the film advance system has been mangled and needs spares.
- In a fourth camera, an Exakta Varex IIa, the shutter curtains stop halfway across the shutter1.
I’ve been working on these shutters quite a lot over the last couple of weeks, and I’ve started to get an understanding of how they are operating, but there are still some gaps in my understanding, so this is the first of the warnings – some information here may not be fully accurate. Also, I’m not a trained camera technician and have only picked up how these cameras work by observation, so there may be errors.
I will update the article as I get to know more, but I can’t guarantee anything at the moment.
This brings me to the reason for writing the article – it’s basically an aid-memoir to myself so that if it takes a couple of months before I get these cameras repaired or acquire a donor camera that I can use for parts, I can at least get to reacquaint myself with my understanding of the shutter quite quickly. Also, it is often useful to write information down as a way of solidifying understanding, so there is also an aspect of that in the writing of his piece.
I could of course have just written notes and not published them, but I’ve found very little information about how the Exakta Varex shutters work on the net, so I thought an article with pictures, videos and an explanation would be useful to others as long as suitable precautions are pointed out.
One good point that applies to all the Exakta Varex cameras is the ease with which the shutter unit can be removed from the camera case. After removing a few screws, it’s possible to remove the whole shutter as a workable unit, so it can be examined and worked on. Another good factor, as I alluded to in the opening paragraph, is that most of the different models used variants of the same shutter, so you don’t always have to find the exact model to get spares – quite often the same parts are used across many of the models.
Shutter action
Basic shutter operation
The simplistic way of understanding the shutter is to think of it as two cloth curtains which are wrapped round rollers held under spring tension. In their rest position, they form a light barrier across the film, and this barrier is kept in place when the shutter is cocked.
The action of cocking the shutter is to move the two curtains in unison across the film plane until they are on the opposite side from their resting position. As this is done, they are being pulled against the tension in the rollers, which increases the tension.
When the shutter is released, the first shutter is allowed to move, and it sharply rewinds around its roller, releasing some of the tension. As it does, this light is allowed to fall on the film because the second curtain is still held in its cocked position.
Depending on the shutter speed selected, the second curtain is then allowed to move as well and follows the first shutter, forming a light tight barrier again. If the shutter speed is slow, there will be a noticeable time between the first shutter curtain closing and the second shutter joining it, but if the speed is fast, the two will be moving together, there will just be a small gap between them.
Exakta Varex Shutter Actions
Although the simplistic view of the shutter above is useful to understand what is happening, there are more actions taking place than just the shutter curtains. For that reason, I’ve listed here the actions that are taking place during the normal course of events with the Exakta Varex when the film advance lever is thrown and then the shutter released. After this, I’ll go through a detailed description of each action.
So, as the film advance is moved over its very long travel:
- Both the curtains are moved from one side of the shutter to the other whilst keeping the two shutter cloths overlapped, so no light gets through to the film, and latch them in place.
- Towards the end of the film advance movement, the mirror is dropped down to allow the image to be seen in the viewfinder (on the later VX1000 shutter, the mirror is already in place).
- As the actions above are happening, the film is advanced one frame.
- When the shutter release is pressed, the first action is to release the catch which holds the mirror in place, so that it flips up out of the path of the light to the film.
- The bracket that pushes the mirror into place also serves as the mechanism to release the latch which is holding the first curtain in its cocked position, thereby allowing it to start its travel across the film plane.
- At a time dependent on the position of the speed setting dial, the second curtain is triggered and starts its travel across the shutter opening (unless B or T is selected)
- If B is selected, the second curtain is triggered when the shutter release button is released
- If T is selected, the second curtain is triggered when the shutter release button is pressed again
- On the later VX1000 shutter, the second curtain completion triggers the mirror to return to its normal position in the light path.
There are also flash sync actions that take place, but for the purpose of this article I’ve ignored those actions.
Exakta Varex IIb shutter actions
The images and video in this section come from both the shutters I’m working on because each shutter has some parts that are working correctly and other parts that aren’t. I’ve therefore used video from both to try to describe how they work.
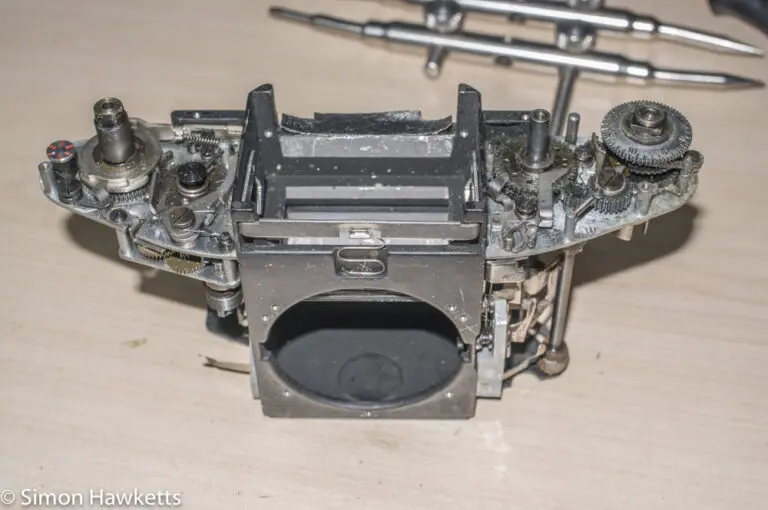
This first large image shows the shutter removed from the camera case. The film advance and shutter cocking mechanism is shown on the right-hand side and the slow speed delay unit on the left-hand side. This unit has been stripped of its film advance lever, shutter speed dial and slow speed dial to show the mechanical parts of the shutter.
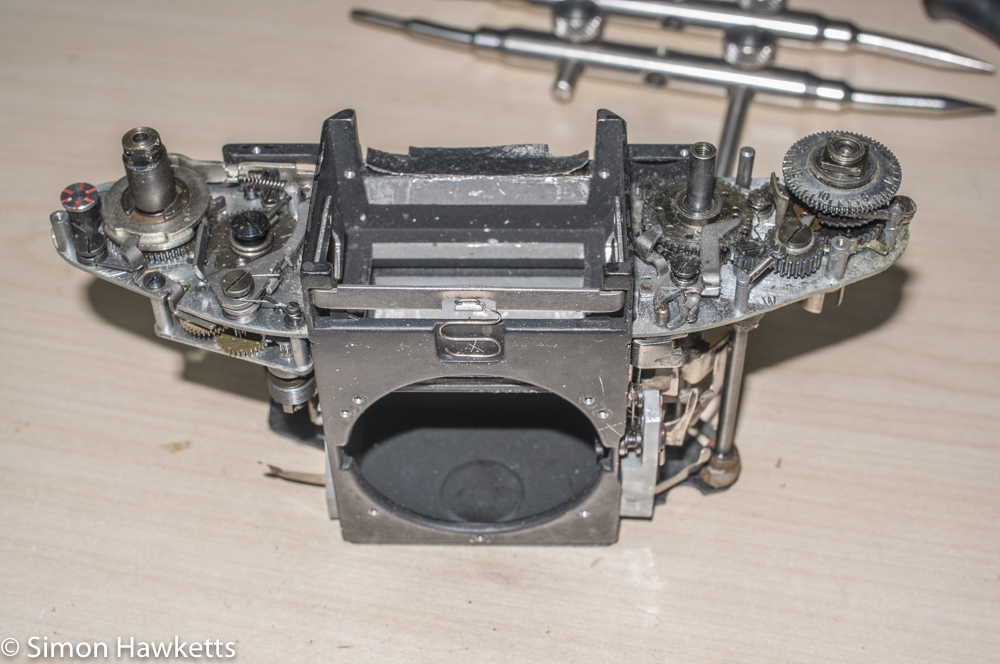
In a later article, I’ll show how to reassemble the film advance lever, which needs to be under tension to work correctly.
One useful thing to note is that the shutter cocking mechanism can be worked using the shutter speed setting knob which, if it’s fitted onto the post it normally sits on and rotated in the direction of the arrow, will cock the shutter. Although the arrow which points to the individual speeds isn’t in place, you actually soon get to know which position is which.
Using the speed knob in this way means the film advance won’t work, but if you are working on the shutter itself that isn’t important.
Action one: Moving the shutter curtains
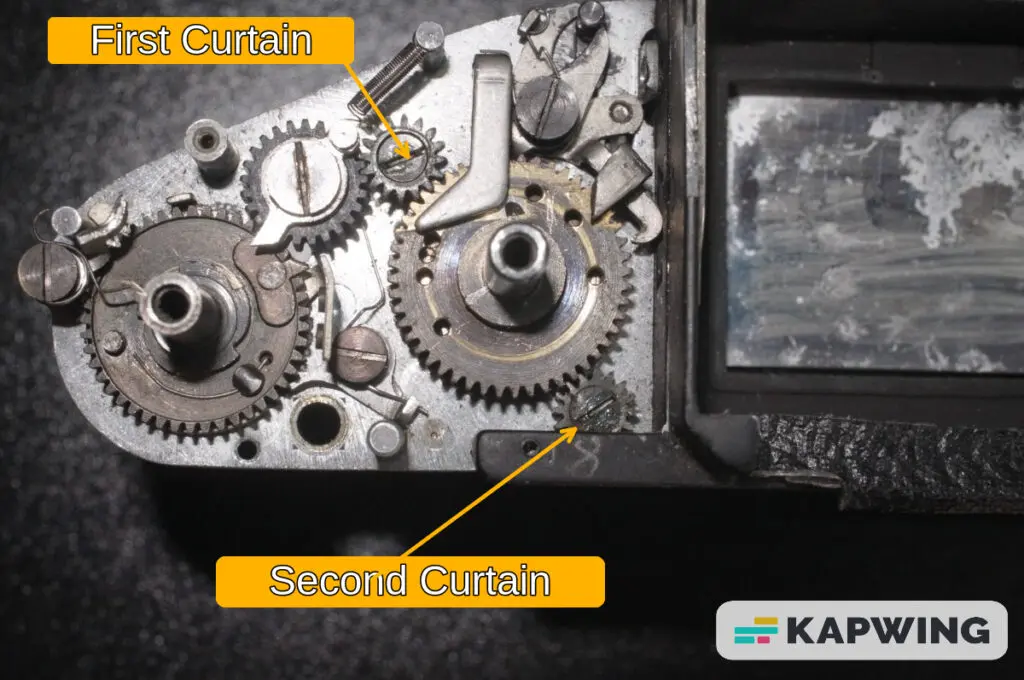
So the first part I mentioned in the list of actions is to move the curtains into place. This is done by two shafts, which are both driven by the main cog that the shutter speed dial sits on. This is shown in the photo here.
The shutter in this photo has been stripped of the film advance and frame counter to make it more obvious which cogs drive the two curtains, and the text has been added to further point these cogs out.
You can see the interaction between the main cog on the right which the shutter speed adjustment dial sits on and the two curtain shaft cogs.
As the large cog on the left is turned by the film advance lever, the drive is transmitted through the interconnecting cogs to turn both the first curtain and the second curtain shaft. This can be seen in the video below.
What the video shows is that when the frame advance is moved (in this particular video I turned the speed setting dial to get the same effect and make the video easier to see), the first curtain is pulled across the film opening by the tapes attached to the curtain, and the second curtain is wound onto the shaft that it is glued to.
The aim is to keep the two curtains overlapped whilst they pass in front of the film so that no light can leak through them. On the shutter I videoed here, that isn’t completely the case because of a small gap at the start, but that isn’t actually important for the purpose of this video.
Just to tie this into the simplistic explanation I gave earlier in the piece, the tensioned rollers are the shafts the first curtain is wrapped around and the shaft the second curtain tapes are wrapped around.
Once the shutters are in place, they need to be kept there, and this is achieved by two separate latches.
The first curtain is latched via a mechanism that engages with the central shaft when the film advance is pulled round to its extreme and the shutters are fully wound up. The video below shows this, although it’s not easy to see.
This is taken looking up into the camera from the bottom of the mechanism to show the latch which is on the underside of the plate that the shutter cogs are on. You can see the shaft with the first curtain tape on rotating, and the shaft next to it is the central shaft which drops the mirror (see next action). Right at the end of the travel, a latch drops into place to hold the central shaft in place.
On one of the shutters I needed to repair I found this latch wasn’t falling into place, and that turned out to be because I’d removed the interconnecting cog from the top plate and put it back one tooth out of place. This is something to watch out for if you remove any of the cogs on the top plate. The alignment is obviously very important for correct operation and timing.
The second shutter is latched via the cog on the top plate that the shutter speed dial sits on. This is difficult to take a video of, and it is mostly hidden by the shutter speed dial, but the video later shows it when the shutter is released.
Action two: Drop the mirror
The mirror is dropped into place by the action of a cam on the shaft that connects to the shutter speed dial.
The cam is fitted about halfway up the shaft, and as the film advance gets to nearly the end of its travel it has moved the cam round to the point where it moves a bracket which is pivoted on a screw and pushes the mirror down into place via a peg on the top of the mirror plate.
The video above shows this cam as the film advance is moved. For most of the shaft rotation nothing is happening, but as the cam hits the bracket you can see the mirror start to move down. Apologies that this video is a little out of focus – it’s difficult to get a camera into place to see some of this.
As the mirror gets to the bottom of its travel, it engages on a latch with in the film chamber, which holds it in the down position.
The video above shows how that latch works. In this case I’m pushing the mirror down with my finger, and I’d just point out that normally you wouldn’t touch the mirror with your fingers, but this mirror is completely shot, so I couldn’t do any more damage.
You can see that as the mirror reaches the bottom of its travel, the catch on the side locks it in position.
Action Three: Advance the film one frame.
The third action that has to happen at the same time as the first two is for the film to be advanced by one frame. This is actually the easiest to understand, because the film advance lever is directly connected to the film advance shaft, and you can see it rotates as the lever is moved.
The film advance has a latch on the top plate which ensures it can’t move back when the film advance is returned to its original position – you can hear it clicking in the video as it engages with the cog teeth.
These first three action are all taking place simultaneously, and obviously there is more going on than just the three actions I’ve listed. The frame counter also has to move forward, for example, but that is a rather more simple operation to understand than the shutter cocking etc.
Action four: Release the mirror
The first part of the shutter cocking action is to release the mirror from its catch that is holding it in place. This action happens by way of the actual shutter release button, which is situated at the front of the camera and is pivoted by a screw about halfway down.
You can see that when the shutter is pressed, at the bottom of the shutter release arm the latch which is holding the mirror is pushed to allow the mirror to flip back up and out of the way of the film.
Action Five: Release the first curtain.
The video above also shows the next action, which is to release the first curtain so that it starts its travel across the film plane to its resting position wrapped round the tensioned roller.
It’s difficult to see because the action takes place quite quickly, but as the mirror is flipped back to the closed position, the bracket which pushed it down in action two, now performs its other function and trips the latch that holds the first curtain in place.
The video that follows is slightly easier to see, but the action takes place quite quickly. The important point to watch is the bracket in the centre of the video, which is moved by the mirror and pushes up the latch holding the first curtain in place.
Triggering the second curtain to release happens on the top plate of the camera, and I’ve made a short explanatory video to show that here. Again, apologies for the slight focus issues. I’m having to do this with my phone hand held at the moment, but when I get better equipment I will re-take this and update the post.
So, to clarify the explanation, when the first curtain is release it pulls back onto its roller which turns the cog at the top of the shaft it is wound on. This in turn causes the bottom cog of the film speed shaft to turn which moves the shutter speed dial, and when the pin on the dial pushes the second curtain latch out of position, it releases the second curtain.
Because there are various positions the pin can sit in around the cog, this changes the timing of the second curtain in relation to the first, thereby altering the shutter speed.
Action Six and Seven: The Bulb and Time positions.
At the moment, I don’t have a clear understanding of the way the B & T settings work. Obviously they stop the triggering of the second curtain until either the shutter release leaver is let back for Bulb or pressed again for Time, and once I get to understand these settings I will update this post.
Exakta Varex Shutter description conclusion
I hope this article has been useful. If it has, please take the time to rate it using the rating system below, or drop me a comment to let me know. Also, if it helped you to repair your camera, I’d really love to know.
Alternatively, if you found there is an area that could be better explained, then please let me know that as well.
Finally, I’d be interested to know it anyone would find similar articles about other makes of camera useful.
- I think this camera has been apart and ‘fixed’ and been left in this state, although I haven’t yet looked in detail at this camera [↩]
Discover more from Everything Vintage
Subscribe to get the latest posts sent to your email.


Hey! Interesting article! I have a problem with my Exakte Varex VX. It suddenly started with the winding lever which was blocked, so I couldnt rotate the lever completely. The long times were also not working anymore. I could only release the shutter when I set the speed dial on T or B.
Then I opened the case to have a look and now I have the problem that the winding lever doesnt transport the film anymore. Guess I mightve fiddled around too much and messed up more than I had hoped to fix.
Do you have any clue about what might be going on here? I can send pictures or videos if you like 🙂
Best regards from Germany
Vincent
Very helpful but one camera that has proved difficult to work on is the Chinon CE-4 and I have 2 to fix. The CE-5 is one of the few I could afford to buy at the time and if I have a problem with these it is usually a roughly finished actuating rod that needs attention and lube at the bottom. I Would like to see a Minolta X500 shutter repair beyond just the capacitors?
Best regards, Colin